Prividium™ Overview
Prividium™ lets institutions operate a private, permissioned blockchain within their own infrastructure or cloud, while still anchoring every transaction to Ethereum for security and finality.
Sensitive data stays entirely off the public chain, but each state update is verified on Ethereum using zero-knowledge proofs.
This design solves a core challenge in enterprise blockchain adoption: how to maintain privacy and control without giving up interoperability with the broader Ethereum ecosystem.
Figure: High-level design of Prividium™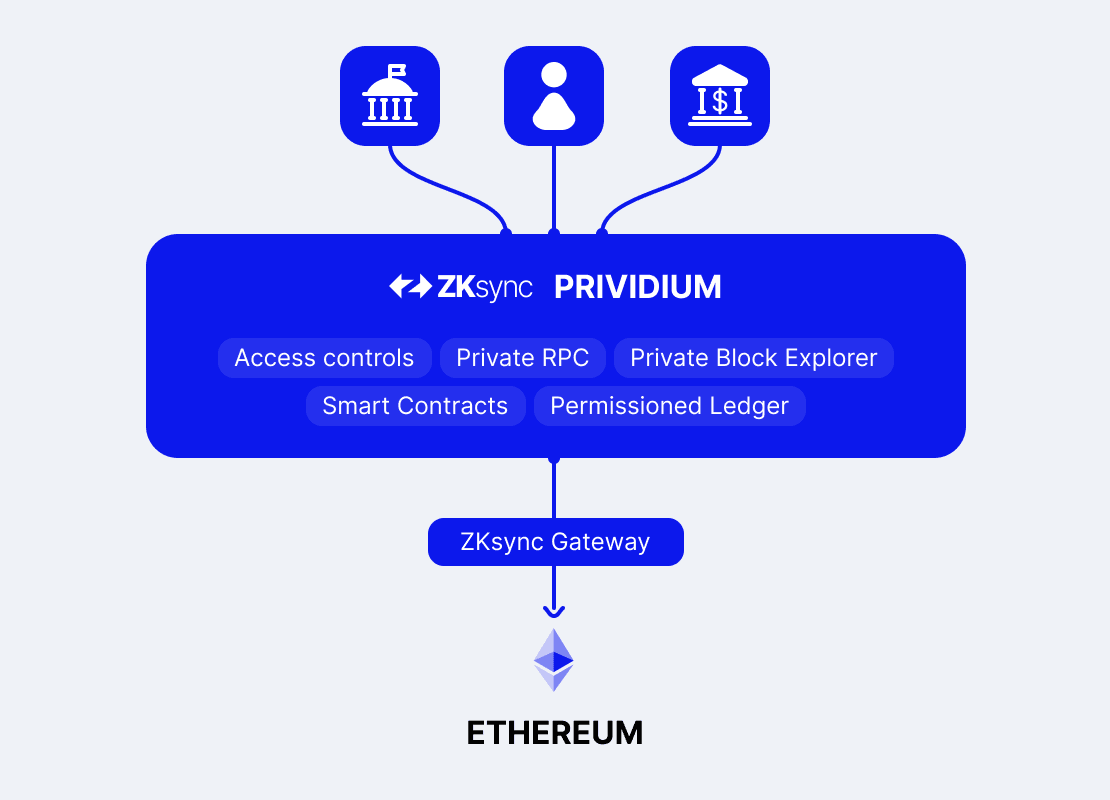
Key Differentiators of Prividium™
Privacy with Control: Transaction data remains offchain, so internal details such as trades and balances stay confidential. Each block is verified on Ethereum using zero-knowledge proofs. Chain operators can selectively disclose specific data (for example, bytecode or token supply) to auditors or regulators without exposing the full ledger.
Role-Based Permissioning: Prividium™ introduces a dynamic permissioning system managed through the Admin Dashboard, replacing static YAML files. Administrators can:
- Add and manage users with Okta or crypto-native (SIWE) authentication
- Create roles such as Trader, Auditor, or Admin
- Assign permissions for contracts and functions directly in the UI
- Configure selective disclosure for public endpoints
Access control is enforced by the Proxy RPC, which validates user tokens against the Prividium API before any on-chain call is executed.
Built-in Compliance: Single sign-on with Okta, address-level identity binding, and fine-grained access policies are integrated out of the box. Only authenticated and authorized users can interact with the network, enabling compliance with KYC, KYB, and AML requirements from day one.
Ethereum Anchoring and Interoperability: Each batch of transactions is finalized on Ethereum using a validity proof, ensuring tamper-proof integrity and trustless settlement. Assets and data can move between Ethereum and other public or private ZKsync Chains using native zero-knowledge-based bridges without external custodians.
Scalability and Performance: As a Validium chain, Prividium™ stores state off-chain, achieving high throughput and low latency. It supports trading, payments, and settlement use cases that demand both privacy and speed.
What Data Is Public
Only the state roots and zero-knowledge proofs are posted to Ethereum. No transaction inputs, addresses, or calldata are visible or inferable from public data.
Selective disclosure can optionally expose verified metrics such as total and circulating token supply, or contract bytecode, through public read-only endpoints.
Interactions with public networks such as deposits or withdrawals remain visible on the receiving chain, but all other state data is kept private within the Prividium™ database.
To learn more about data availability in the ZK Stack, visit the Validium page.
How It Works
Prividium™ enforces privacy and access control using built-in infrastructure within the ZK Stack.
- Users authenticate through Okta SSO or Sign-in With Ethereum (SIWE).
- All calls pass through the Proxy RPC, which checks the user’s token and permissions against the Prividium API.
- Roles and permissions are defined in the Admin Dashboard, not static YAML files.
- Access is controlled at the contract-function level, with optional restrictions based on function arguments.
- Auditors and regulators can use Selective Disclosure to view approved on-chain data without accessing the private ledger.
- Full RPC and explorer access remain restricted to chain operators and internal systems.
The chain runs as a Validium. It executes transactions privately and stores its state off-chain in a secure database. Each batch of transactions produces a zero-knowledge proof and a new state root submitted to Ethereum. This anchors the private chain to Ethereum, ensuring verifiable security and finality without revealing sensitive data.