Paymaster

Implement a paymaster flow into your project.

Welcome to the final part of our ZKsync 101 series on mastering ZKsync development! In this guide, we move beyond the basics of smart contract deployment and the creation of contract factories to explore the innovative concept of paymasters in the ZKsync ecosystem. This guide will illuminate the power of paymasters to revolutionize transaction fee management and enhance user experiences within your dApps.

Delve deeper into ZKsync development with the introduction of paymasters.

Learn how paymasters can cover transaction fees for your dApp users, enhancing accessibility and user experience.

Discover the flexibility of fee payment with paymasters, including the ability to pay fees in ERC20 tokens on ZKsync Era, using Hardhat or Foundry.

Embark on this journey to understand how paymasters can add a new layer of functionality and user-friendliness to your decentralized applications.

What is a Paymaster?

Paymasters in the ZKsync ecosystem represent a groundbreaking approach to handling transaction fees. They are special accounts designed to subsidize transaction costs for other accounts, potentially making certain transactions free for end-users. This feature is particularly useful for dApp developers looking to improve their platform's accessibility and user experience by covering transaction fees on behalf of their users.

Built-in Paymaster Flows

Paymasters can operate under various flows, some of which may require user interaction, such as setting allowances for token swaps. These flows enable paymasters to support a wide range of use cases, from simple fee subsidies to more complex scenarios involving ERC20 token exchanges for transaction fees.

  • General Paymaster Flow: This default flow requires no preliminary actions from users, allowing paymasters to interpret transaction data as needed to cover fees.
  • Approval-Based Paymaster Flow: For operations requiring user permissions, such as token allowances, this flow provides a structured approach. It ensures that user tokens can be seamlessly exchanged for transaction fees, subject to user-approved limits.

As we explore paymasters, remember that while they offer enhanced flexibility for fee management, their implementation should always prioritize security and user trust. This guide aims to equip you with the knowledge to effectively incorporate paymasters into your ZKsync projects, paving the way for more user-friendly and accessible dApps.

The paymaster smart contract code is provided "as-is" without any express or implied warranties.
  • Users are solely responsible for ensuring that their design, implementation, and use of the paymaster smart contract software complies with all applicable laws, including but not limited to money transmission, anti-money laundering (AML), and payment processing regulations.
  • The developers and publishers of this software disclaim any liability for any legal issues that may arise from its use.
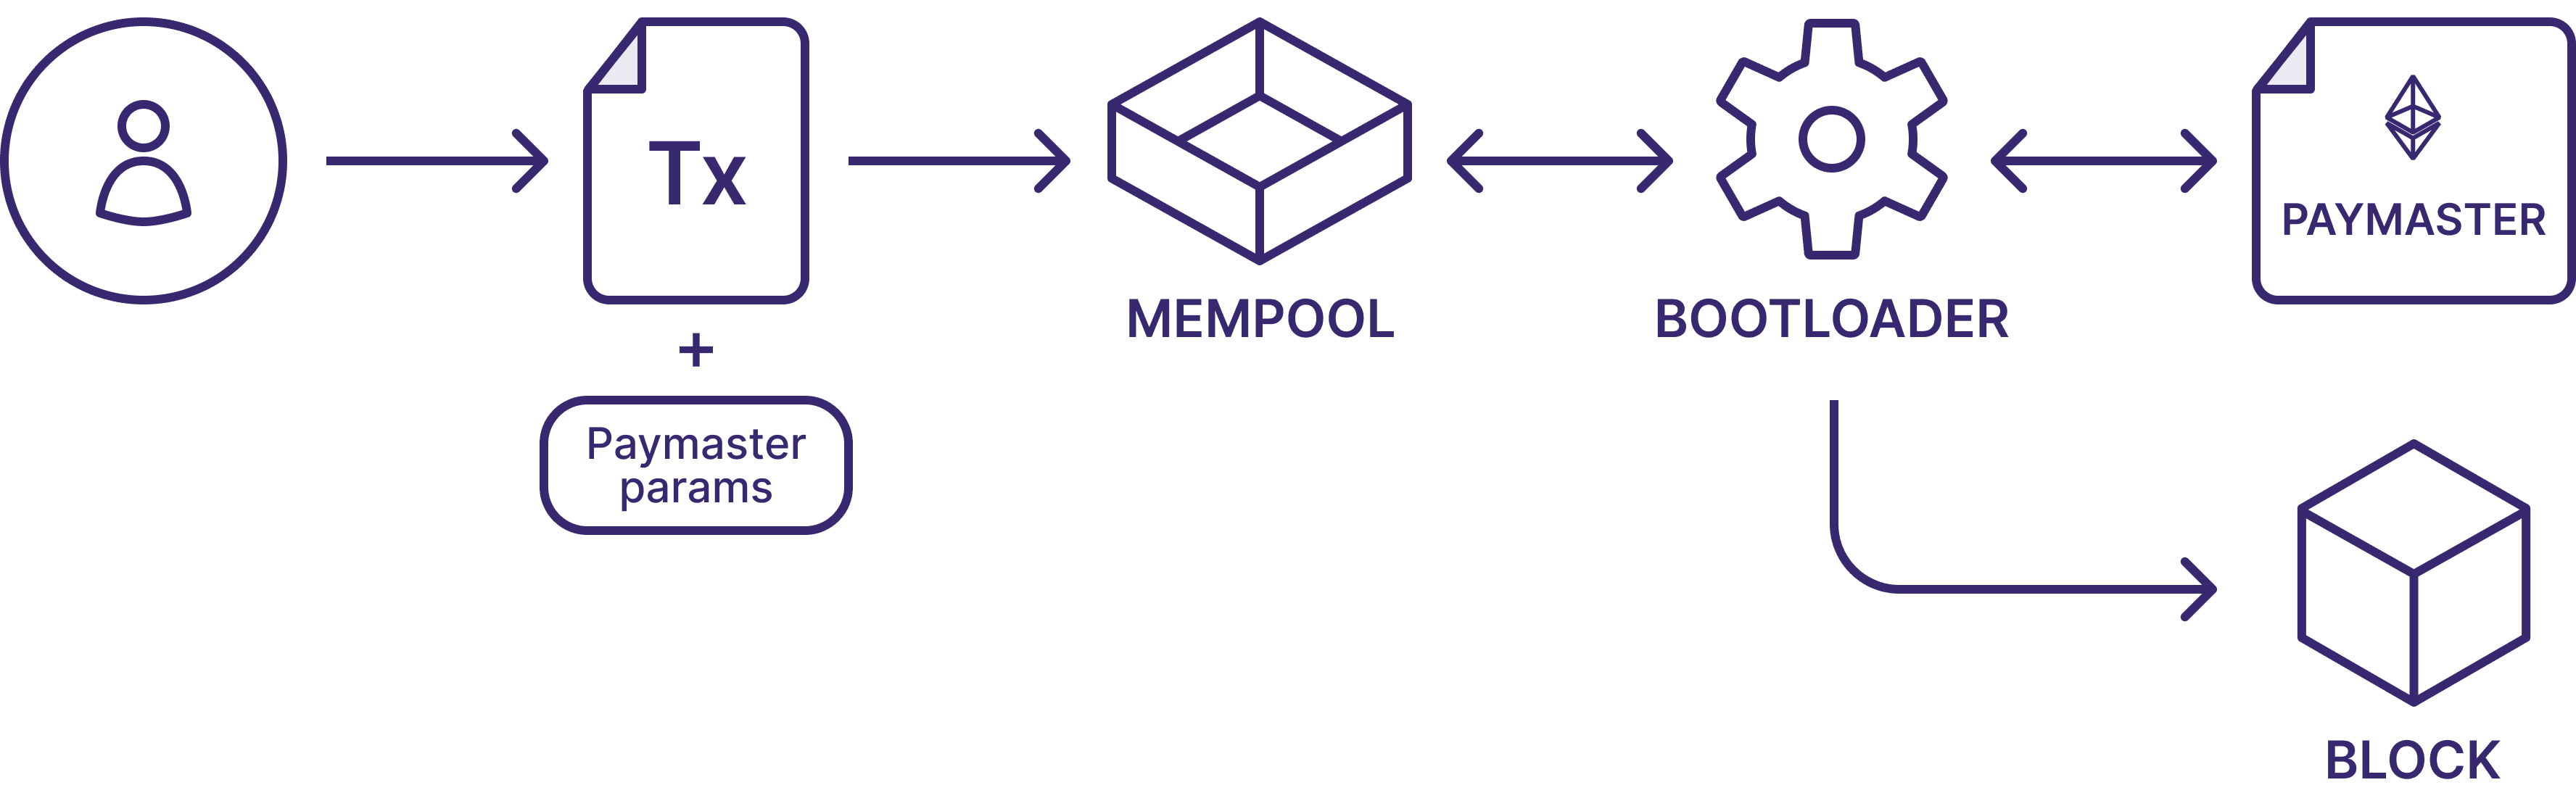
Paymaster flow

Select the paymaster type you want to get started using ZKsync Era with.

Run the following command in your terminal to initialize the project.

npx zksync-cli@latest create --template qs-paymaster contract-paymaster-quickstart
cd contract-paymaster-quickstart

Set up your wallet

Deploying contracts on the ZKsync Sepolia Testnet requires having testnet ETH. If you're working within the local development environment, you can utilize pre-configured rich wallets and skip this step. For testnet deployments, you should have your wallet funded from the previous step.


Understanding the GaslessPaymaster contract

Let's start by reviewing the GaslessPaymaster.sol contract in the contracts/ directory:

Key components:

  • The GaslessPaymaster contract ensures that transaction fees are handled automatically without user intervention.
  • validateAndPayForPaymasterTransaction Method: This mandatory method assesses whether the paymaster agrees to cover the transaction fees. If affirmative, it transfers the necessary funds (calculated as tx.gasprice * tx.gasLimit) to the operator. It returns a context for the postTransaction method.
  • postTransaction Method: An optional method invoked post-transaction execution, provided the transaction doesn't fail due to out-of-gas errors. It receives several parameters, including the transaction's context and result, aiding in finalizing paymaster duties.
  • onlyBootloader Modifier: Ensures that certain methods are exclusively callable by the system's bootloader, adding an extra layer of security and control.

Compile and deploy the GaslessPaymaster contract

Smart contracts deployed to ZKsync must be compiled using our custom compiler. zksolc is the compiler used for Solidity.

To compile the contracts in a project, run the following command:

npm run compile

Upon successful compilation, you'll receive output detailing the zksolc and solc versions used during compiling and the number of Solidity files compiled.

Compiling contracts for ZKsync Era with zksolc v1.4.0 and solc v0.8.17
Compiling 4 Solidity file
Successfully compiled 4 Solidity file

The compiled artifacts will be located in the /artifacts-zk folder.

The script to deploy the GaslessPaymaster is located at /deploy/deployGaslessPaymaster.ts.

deployGaslessPaymaster.ts
import { deployContract, getWallet, getProvider } from "./utils";
import { ethers } from "ethers";

// An example of a basic deploy script
// It will deploy a CrowdfundingCampaign contract to selected network
// `parseEther` converts ether to wei, and `.toString()` ensures serialization compatibility.
export default async function() {
  const contractArtifactName = "GaslessPaymaster";
  const constructorArguments = [];
  const contract = await deployContract(
    contractArtifactName,
    constructorArguments
  );
  const wallet = getWallet();
  const provider = getProvider();

  // Supplying paymaster with ETH
  await (
    await wallet.sendTransaction({
      to: contract.target,
      value: ethers.parseEther("0.005"),
    })
  ).wait();

  let paymasterBalance = await provider.getBalance(contract.target.toString());
  console.log(`Paymaster ETH balance is now ${paymasterBalance.toString()}`);
}

Key Components:

  • deployContract Method: Utilized for deploying the GaslessPaymaster contract. This method takes the name of the contract and any constructor arguments needed for initialization, mirroring the deployment process used for the CrowdfundingCampaign contract.
  • Funding the Paymaster: An important step where the deployed GaslessPaymaster contract is funded with ETH to cover transaction fees for users. The script sends a transaction from the deployer's wallet to the paymaster contract, ensuring it has sufficient balance to operate.

Execute the deployment command corresponding to your package manager. The default command deploys to the configured network in your Hardhat setup. For local deployment, append --network inMemoryNode to deploy to the local in-memory node running.

npx hardhat deploy-zksync --script deployGaslessPaymaster.ts
# To deploy the contract on local in-memory node:
# npx hardhat deploy-zksync --script deployGaslessPaymaster.ts --network inMemoryNode

Upon successful deployment, you'll receive output detailing the deployment process, including the contract address, source, and encoded constructor arguments:

Starting deployment process of "GaslessPaymaster"...
Estimated deployment cost: 0.0004922112 ETH

"GaslessPaymaster" was successfully deployed:
 - Contract address: 0x6f72f0d7bDba2E2a923beC09fBEE64cD134680F2
 - Contract source: contracts/GaslessPaymaster.sol:GaslessPaymaster
 - Encoded constructor arguments: 0x

Requesting contract verification...
Your verification ID is: 10634
Contract successfully verified on ZKsync block explorer!
Paymaster ETH balance is now 5000000000000000

Interact with the GaslessPaymaster contract

This section will navigate you through the steps to interact with the GaslessPaymaster contract, using it to cover transaction fees for your operation.

The interaction script is situated in the /deploy/interact/ directory, named interactWithGaslessPaymaster.ts.

Ensure the CONTRACT_ADDRESS and PAYMASTER_ADDRESS variables are set to your deployed contract and paymaster addresses, respectively.

Key Components:

  • Paymaster Parameters: Before executing transactions that involve the contract, the script prepares paymaster parameters using getPaymasterParams. This specifies the paymaster contract to be used and the type of paymaster flow, which in this case is General.
  • Transaction with Paymaster: Demonstrated by the contribute function call, the script shows how to include paymaster parameters in transactions. This allows the paymaster to cover transaction fees, providing a seamless experience for users.

Execute the command corresponding to your package manager:

npx hardhat deploy-zksync --script interact/interactWithGaslessPaymaster.ts

Upon successful usage, you'll receive output detailing the transaction:

Running script to interact with contract 0x68E8533acE01019CB8D07Eca822369D5De71b74D using paymaster 0x6f72f0d7bDba2E2a923beC09fBEE64cD134680F2
Wallet balance before contribution: 5.879909434005856127 ETH
Transaction hash: 0x41c463abf7905552b69b25e7918374aab27f2d7e8cbebe212a0eb6ef8deb81e8
Wallet balance after contribution: 5.869909434005856127 ETH

🎉 Great job! You've successfully interacted with the CrowdfundingCampaignV2 using a paymaster to cover the transaction fees.

Run the following command in your terminal to initialize the project.

npx zksync-cli@latest create --template qs-paymaster contract-paymaster-quickstart
cd contract-paymaster-quickstart

Set up your wallet

Deploying contracts on the ZKsync Sepolia Testnet requires having testnet ETH. If you're working within the local development environment, you can utilize pre-configured rich wallets and skip this step. For testnet deployments, you should have your wallet funded from the previous step.


Understanding the ApprovalPaymaster contract

Let's start by reviewing the ApprovalFlowPaymaster.sol contract in the contracts/ directory:

Key components:

  • The ApprovalFlowPaymaster contract allows for transactions costs to be covered using an allowed ERC20 token at the exchange of 1.
  • Allowed Token: Transactions are facilitated using the CROWN token at address 0x927488F48ffbc32112F1fF721759649A89721F8F, with a fee set at a constant value of 1.
  • validateAndPayForPaymasterTransaction Method: This critical method evaluates transactions to decide if the contract will cover the gas fees. It confirms the token used matches the allowed token and checks if the token allowance is adequate. If conditions are met, it proceeds to transfer funds calculated as tx.gasprice * tx.gasLimit to the bootloader.
  • postTransaction Method: An optional method invoked post-transaction execution, provided the transaction doesn't fail due to out-of-gas errors. It receives several parameters, including the transaction's context and result, aiding in finalizing paymaster duties.
  • onlyBootloader Modifier: Ensures that certain methods are exclusively callable by the system's bootloader, adding an extra layer of security and control.

Compile and deploy the ApprovalFlowPaymaster contract

Smart contracts deployed to ZKsync must be compiled using our custom compiler. zksolc is the compiler used for Solidity.

To compile the contracts in a project, run the following command:

npm run compile

Upon successful compilation, you'll receive output detailing the zksolc and solc versions used during compiling and the number of Solidity files compiled.

Compiling contracts for ZKsync Era with zksolc v1.4.0 and solc v0.8.17
Compiling 1 Solidity file
Successfully compiled 1 Solidity file

The compiled artifacts will be located in the /artifacts-zk folder.

The script to deploy the ApprovalFlowPaymaster contract is located at /deploy/deployApprovalFlowPaymaster.ts.

deployApprovalFlowPaymaster.ts
import { deployContract, getWallet, getProvider } from "./utils";
import { ethers } from "ethers";

// An example of a basic deploy script
// It will deploy a CrowdfundingCampaign contract to selected network
// `parseEther` converts ether to wei, and `.toString()` ensures serialization compatibility.
export default async function() {
  const contractArtifactName = "ApprovalFlowPaymaster";
  const constructorArguments = [];
  const contract = await deployContract(
    contractArtifactName,
    constructorArguments
  );
  const wallet = getWallet();
  const provider = getProvider();

  // Supplying paymaster with ETH
  // Paymaster will receive CROWN tokens from users and
  // cover the gas fees for the transactions using ETH
  await (
    await wallet.sendTransaction({
      to: contract.target,
      value: ethers.parseEther("0.005"),
    })
  ).wait();

  let paymasterBalance = await provider.getBalance(contract.target.toString());
  console.log(`Paymaster ETH balance is now ${paymasterBalance.toString()}`);
}

Key Components:

  • deployContract Method: Utilized for deploying the ApprovalFlowPaymaster contract. This method takes the name of the contract and any constructor arguments needed for initialization, mirroring the deployment process used for the CrowdfundingCampaign contract.
  • Funding the Paymaster: An important step where the deployed ApprovalFlowPaymaster contract is funded with ETH to cover transaction fees for users. The script sends a transaction from the deployer's wallet to the paymaster contract, ensuring it has sufficient balance to operate.

Execute the deployment command corresponding to your package manager. The default command deploys to the configured network in your Hardhat setup. For local deployment, append --network inMemoryNode to deploy to the local in-memory node running.

npx hardhat deploy-zksync --script deployApprovalFlowPaymaster.ts
# To deploy the contract on local in-memory node:
# npx hardhat deploy-zksync --script deployApprovalFlowPaymaster.ts --network inMemoryNode

Upon successful deployment, you'll receive output detailing the deployment process, including the contract address, source, and encoded constructor arguments:

Starting deployment process of "ApprovalFlowPaymaster"...
Estimated deployment cost: 0.0006278488 ETH

"ApprovalFlowPaymaster" was successfully deployed:
 - Contract address: 0x4653CDB4D46c7CdFc5B1ff14ca1B15Db2B0b7819
 - Contract source: contracts/ApprovalFlowPaymaster.sol:ApprovalFlowPaymaster
 - Encoded constructor arguments: 0x

Requesting contract verification...
Your verification ID is: 10923
Contract successfully verified on ZKsync block explorer!
Paymaster ETH balance is now 5000000000000000

Interact with the ApprovalFlowPaymaster contract

This section will navigate you through the steps to interact with the ApprovalFlowPaymaster contract, using it to cover transaction fees for your operation.

Obtain CROWN tokens

The ApprovalFlowPaymaster requires CROWN tokens to cover transaction gas costs. To use this paymaster, you will first need to acquire CROWN tokens by minting them yourself. Follow these steps to mint CROWN tokens:

  1. Go to the CROWN token contract on Sepolia.
  2. Click on the Contract tab.
  3. Navigate to the Write tab.
  4. Locate the mint function, which is typically labeled as 6.mint:
    • In the _to field, enter your wallet address where you want the tokens to be deposited.
    • In the _amount field, specify the number of tokens you wish to mint.
  5. Click on the mint button to execute the transaction.

Here is a visual guide to assist you: CROWN mint

Ensure that your wallet is connected and configured for the Sepolia network before attempting to mint tokens.

Interaction script

The interaction script is situated in the /deploy/interact/ directory, named interactWithApprovalFlowPaymaster.ts.

Ensure the CONTRACT_ADDRESS and PAYMASTER_ADDRESS variables are set to your deployed contract and paymaster addresses, respectively.

Key Components:

  • Paymaster Parameters: Before executing transactions that involve the contract, the script prepares paymaster parameters using getPaymasterParams. This specifies the paymaster contract to be used and the type of paymaster flow, which in this case is Approval, and includes the token address of the ERC20 token, and the minimum allowance set to 1.
  • Transaction with Paymaster: Demonstrated by the contribute function call, the script shows how to include paymaster parameters in transactions. This allows the paymaster to cover transaction fees using the CROWN token, providing a seamless experience for users.

Execute the command corresponding to your package manager:

npx hardhat deploy-zksync --script interact/interactWithApprovalFlowPaymaster.ts

Upon successful usage, you'll receive output detailing the transaction:

Running script to interact with contract 0x68E8533acE01019CB8D07Eca822369D5De71b74D using paymaster 0x4653CDB4D46c7CdFc5B1ff14ca1B15Db2B0b7819
Estimated gas limit: 459220
Transaction hash: 0x6a5a5e8e7d7668a46260b6daf19c7a5579fa4a5ba4591977a944abb1a618187a

🎉 Great job! You've successfully interacted with the CrowdfundingCampaignV2 using a paymaster to cover the transaction fees using the CROWN token.

Takeaways

  • Comprehensive Understanding of Paymaster Contracts: This guide has provided a detailed look at both the ApprovalFlowPaymaster and the GaslessPaymaster contracts, illustrating how they manage transaction fees in ZKsync. These paymasters are pivotal in handling gas payments, offering a more accessible transaction experience for users.
  • Flexibility and User Empowerment: By covering the transaction fees through ERC20 tokens or general subsidies, these paymaster contracts offer significant flexibility and reduce the friction typically associated with on-chain interactions. This feature enhances user engagement and adoption of dApps.

Next Steps

  • Experiment with Different Paymaster Contracts: Now that you are familiar with both approval-based and general paymaster flows, you can experiment with these contracts by deploying them under various conditions and with different types validations, restrictions and enhancements.
  • Develop a Front-End Interface: Consider building a user interface that interacts with the paymaster contracts you have deployed. This will not only improve the usability of your contracts but also provide practical insights into how end-users interact with your dApps in real-world scenarios.
  • Community Engagement and Contribution: Join the vibrant ZKsync community. Participate in forums, Discord, or GitHub discussions. Sharing insights, asking queries, and contributing can enrich the ecosystem and your understanding of ZKsync.

Made with ❤️ by the ZKsync Community